Hosting a Laravel Project with Netlify
Spoiler alert! It isn’t possible to host a Laravel Project with Netlify. This isn’t an unheard of question for those who may not understand what Netlify actually does.
My simplest explanation: Netlify is a static website hosting service that can automatically build and deploy your project from a git repository.
A more accurate title for this post would have been “Automatically building, deploying, and hosting your Laravel project’s front end assets with SSL and Netlify”, however that is terribly verbose. If you are interested in learning a technique to build, deploy, and host your front end assests with SSL and Netlify please continue reading.
Building, Deploying, and Hosting Front End Assets Automatically
If you use the Laravel provided front end scaffolding you will eventually end up wondering how to publish/manage assets after compilation as to which there is no right answer.
Personally, I prefer to keep a clean commit history and therefore do not commit compiled assets. Instead I do my asset compilation post commit as part of a build step.
Enter Netlify…
Netlify
As mentioned earlier, Netlify is “an all-in-one workflow that combines global deployment, continuous integration, and automatic HTTPS” and it is the perfect solution to build and deploy our front end assets.
All it takes is three easy steps to setup a project in Netlify. Numbers 1 and 2 are super straight forward, step 3 isn’t that difficult either:

Tada! That’s all it takes to configure Netlify to build your front end Laravel Mix assets. Now anytime you merge/push to master Netlify will run a build and deploy the newly compiled assets.
Connecting to Netlify
Now that your assets are deployed on Netlify’s CDN you need to make some changes to utilize those assets. There are at least two ways I can think of to integrate your Netlify assets with your Laravel site. The first is to use a subdomain for your Netlify hostname and reference all of your static content from cdn.example.com while leaving your main domain alone. I will not cover this method as I’ve found a more clever way to host both the front end and back end from a single domain (www.phpjobs.app).
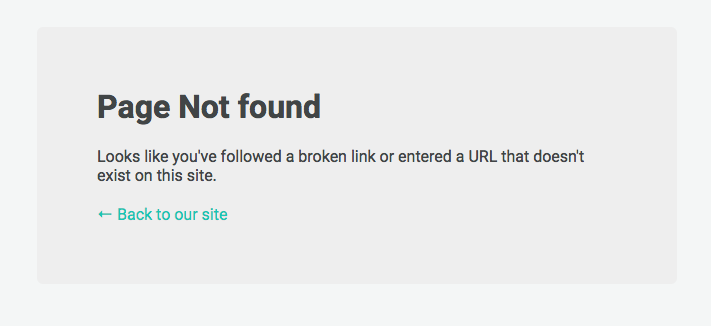
In domain settings Netlify has all the steps necessary to connect a domain name to your Netlify site. Once completed all traffic to example.com will now go through Netlify. For example, requests to myexample.com/js/app.js will now be served from Netlify’s CDN and never from your back end server. There is still one lingering issue: how does Netlify know when I need requests to go to the backend vs. the front end? Short answer: it doesn’t, all requests that are not to actual files in the public/ folder will end up with 404 errors. No worries, Netlify has a solution to this.
Requests to myexample.com/api/foo/bar will result with this:
Talking to the Backend
To satisfy requests to non-static files we can utilize Netlify redirects to send these requests to a different server. By adding the configuration below to a file called netlify.toml in your root git directory all unservable requests will now be forwarded to a different server all transparent to the requesting user.
[[redirects]]
  from = "/*"
  to = "http://backend.example.com/:splat"
  status = 200
Now both example.com/public/js/app.js and example.com/api/foo/bar will work just fine running through Netlify.
Pitfalls of Proxy with Laravel
In the given example here with our Laravel project running at http://backend.example.com you will notice that links generated by Laravel will use the same scheme and domain. For example if you have a route named home that points to /home and you generate a url with route(‘home’) it will be generated as http://backend.example.com/home. This is obviously not what you want, to solve the schema problem so that every url generated uses https you need to set \URL::forceScheme('https'); inside of your AppServiceProvider::boot method. Now route(‘home’) will generate as https://backend.example.com/home. The next step is to get your domain to be the one you are pointing at Netlify and not the one the backend is listening on. To do that set \URL::forceRootUrl(\Config::get('app.url')); inside of AppServiceProvider::boot. Now you will generate the url you expect at https://example.com/home.
My AppServiceProvider:
<?php

namespace App\Providers;

use App\Observers\JobObserver;
use Illuminate\Support\ServiceProvider;

class AppServiceProvider extends ServiceProvider
{
    /**
     * Bootstrap any application services.
     *
     * @return void
     */
    public function boot()
    {
        if($this->app->environment() == 'production') {
            \URL::forceScheme('https');
            \URL::forceRootUrl(\Config::get('app.url'));
        }
    }

    /**
     * Register any application services.
     *
     * @return void
     */
    public function register()
    {
        //
    }
}
HTTPS Always
A side benefit of sending all your traffic through Netlify is you do not have to worry about managing SSL certs on your backend server. Netlify will automatically provision SSL certificates for you, even on your custom domain.
Workflow
There is a minor workflow issue you need to consider when connecting Netlify to your git repository. Every time there is a new commit in your master branch Netlify will pull in your code and deploy those changes. This can pose problems where your front end code does not match the same commit as your backend. For phpJobs.app this hasn’t been a big deal, as I am the only one merging code I can simply push the backend as soon as I merge the code.
If you want to sync your back and front end deployments you can have your back end deployed upon merges to master or for better timed deploys you can lock front end deploys and roll the deployment (via API) when the backend has been deployed.
Thanks for reading.
If you are looking to make a change in your career consider checking out our job listings, subscribing to our newsletter, and following us on Twitter @__phpJobs__.